Hario Switch – Dual Purpose V60 Dripper – Brew Guide & Review

The Hario Switch is very similar to the Clever Dripper immersion brewer that we previously did a brew guide on. However, the Switch can also be used as a regular pour over dripper for added versatility, and it also uses V60 filter paper. At the bottom is a switch that moves a stainless steel ball up or down to open and close the valve. Leave the switch open and you can use it as a regular pour over dripper.

In our brew methods post we talked about how immersion brew methods tend to be much more forgiving than percolation methods, so this is the best of both worlds. Immersed coffee tends to have more body while a pour over has a cleaner cup with more clarity, try it both ways to see how you like it. With immersion brewing on the switch you just add hot water and stir and let it sit there for 2-3 minutes (detailed instructions below), if you forget the timing or don’t have the perfect grind size the coffee won’t be ruined, you should still have a very drinkable cup of coffee. If you mess up the timing or grind size on a pour over you can taste the results. 

One of the things that you may like with the Hario Switch is that the construction is glass and silicon rather than plastic like with the Clever Dripper. The filter papers is uses are the same as for V60 pour over, which may or may not be a plus since the Clever Dripper uses #4 cone filters that are used in many coffee makers and more easy to find.

The glass portion of the Hario Switch is the same as their glass pour over dripper, so if you break it you can easily replace it. I always recommended getting the 03 size so you can scale your brew up or down as you need, one thing about the Switch is that the diameter of the base is a little wider so you may have trouble putting this onto a travel mug or narrower mug, most “normal” sized mugs should be fine. Pair it with the Hario Beaker and you won’t have any issues.

They sell the 02 size in a set with the smaller beaker which if you know you won’t need to make larger brew sizes this is a good option. The large beaker is marked to 600 ml and the smaller beaker is marked to 300 ml, there is some space above the top marking so you won’t overflow.

The Hario Switch V60 Set in 02 Size, we recommend the 03 size for bigger brews.

What you will need:

Instructions:

  1. Boil the water in your kettle, it doesn’t matter if you have a gooseneck kettle or not.
  2. While your water is warming, using the recipe sheet and on the resources page, grind your coffee by weight to a medium/fine ground, similar to table salt. I would use a maximum brew size of about 450 ml, so for this example we will use 27 grams of coffee for 450 ml of water.
  3. Insert your V60 filter paper and rinse with hot water with the switch open. Dispose of the water.
  4. Place Hario Switch and Beaker on your scale and tare to zero with the switch closed.
  5. Add the 27 grams of coffee.
  6. Add 2-3x the weight of coffee of hot water and swirl to bloom for 30 seconds. Ensure all grounds are wet.
  7. Add the remaining water until the scale reaches 450 grams. (You can also try to add the 450 ml of water first and coffee second without bloom, this will aid in a faster drawdown time, see which you prefer.)
  8. Allow the coffee to steep for another 2:00.
  9. At the end of the steep stir the crust. Wait another 15-30 seconds after the stir to allow the grounds to sink.
  10. Flip the switch to the open position to begin the drawdown into your beaker
  11. Stir the coffee before serving.

Breville Barista Pro Review and Introduction to Espresso


If you want to dive into the world of home espresso, the learning curve can be steep, but some of the consumer grade appliances made by Breville can help make it easier. I originally wanted to purchase a no frills espresso machine like the Gaggia Classic Pro or Rancilio Silvia that come highly recommended as starter machines, but require much more manual operation. However, I was able to find a great deal on a Breville Barista Pro, which is the upgrade model to the very popular Breville Barista Express. You are able to program your shot volume for easy repeatability in these machines, which cannot be done on the Gaggia or Rancilio that I just mentioned, also these Breville machines heat up much faster and can be used in under a minute after turning on, the other machines recommend up to 20 minutes on time before espresso can be made. An important thing to note is that Nespresso, despite its name, is not actually espresso, neither is AeroPress. Only an espresso machine, electric or lever, can generate enough pressure to make proper espresso

These Breville machines have a built in grinder with similar performance to that of the Breville Smart Grinder Pro. The Pro adds faster heating technology, stepless grind adjustment, a better steam wand, an LCD interface with shot timer and some other small changes such as an angled hot water spout. The Pro loses the pressure gauge that was so prominent in the Express model. If you want to add automatic milk steaming and a touch screen interface the Breville Barista Touch offers those features.

Basics of Making Espresso: 

If you know nothing about making espresso, but are willing to make a little bit of a mess and put in some effort these are great options for home espresso. As always you will want to get yourself a scale, some quality coffee and I’ll list some “nice to have” accessories at the bottom of this post. 

Espresso recipes are stated as grams of coffee in, liquid/crema out, in how many seconds. A good starting point is 18 grams of ground coffee in, 36 grams of liquid out in around 30 seconds. You will want to adjust your grind size coarser to help the shot pull faster and finer to slow down the shot. This process is referred to as dialing in your shot, which can also entail pre-infusion, pressure, temperature and other variables. However, to start off, just use the default settings and focusing on the grams in, grams out in how many seconds. If you’re buying specialty coffee, sometimes your roaster may be able to help you dial in your shot. 

As all grinders have some degree of coffee retention so it is recommended that you purge the coffee stuck in your grinder when adjust your grind size. In my test of a completely empty Pro model, the grinder retained 3.6 grams of coffee, which is pretty high. If you don’t purge you will end up with a shot pulled from a mix of two different grind sizes.

The portafilter and basket is what you will dose your coffee grounds into, the preparation of the puck and tamping is an important step. You can get really advanced with puck rakes, distribution tools and fancy tamps. An improperly prepared coffee puck can lead to channeling where the water finds the path of least resistance and forms a channel in your coffee which can lead to unpleasant flavors. The easiest way to diagnose this is to use a bottomless portafilter

If you plan on drinking the espresso straight, dialing in the shot correctly is very important, however if you mainly plan on making milk based drinks some of the smaller changes may not be noticeable as you are diluting your espresso with milk. 

Steps to making Espresso with Breville Espresso Machines:

  1. Pull a blank/empty shot into your portafilter, just run a single shot through to warm up your portafilter and basket. Use a clean rag to wipe clean/dry. Your machine will come with regular and pressurized baskets, for best results use the regular/non-pressurized double basket as pressurized baskets are better for pre-ground or unevenly ground coffee.
  2. The built-in grinder offers time based grinding, however I prefer to single-dose my coffee by starting with an empty hopper and adding 18 grams of pre-weighed coffee in for grinding. You may need to account for grinder retention so check the weight of the coffee coming out as well. I keep a small whiteboard by my machine that shows the empty portafilter weight and the weight + 18 grams. Remember to purge a few grams of coffee if changing grind size or different coffee.
  3. Give your coffee grounds a small spray of water from a spray bottle to help control static.
  4. Grind your coffee into your portafilter and prepare your puck. Tamp your grounds evenly and consistently. I’ve listed some tools below that can help with this.
  5. Place a scale and cup under the portafilter and select the custom shot option for your machine, the manual for the pro is linked here. Tare the scale and pull the shot until you get 36 grams of liquid out. You want this to happen in about 30 seconds, the Pro has a shot timer built in, if you are using the Express you will need to use a scale with a timer or time it yourself. 
  6. Adjust grind setting as needed to modulate taste, like I said, a good starting point is to aim for 30 seconds. There are many options with coffee recipes with different ratios and variables, but this is just our starting point for new home baristas. Try to only change one variable at a time. 
  7. Once your shot in pulled, stir, not swirl, with a spoon and taste. As you begin to refine and dial in your shots you can explore different shot ratios. Ristretto and Lungo shots are different ratios and you can also explore different temperatures and dose sizes. This process will get easier with practice. 
  8. Once you have dialed in you coffee and programmed your shot volume, you can press the shot button and let it run for future shots. However, you need to make sure you have consistent puck preparation for best results. You will need to dial in your espresso every time you get a new bag of coffee, sometimes even with the same type and brand of coffee. 
  9. If you are making a milk based drink, there are lots of videos online that will show you how to steam milk, I’ll link some below that I found helpful. This just takes practice, but I also found that having a thermometer helps with this process. Make sure to clean and purge your steam wand after every use. 
  10. Knock out your used coffee puck and do a quick purge of your machine with a blank shot without the portafilter and basket and wipe your portafilter clean. 
  11. Follow instructions on how to clean and maintain your machine. It’s best to use soft water to prevent scaling. I use Cafiza for weekly back flushing and a Dezcal for descaling. Grindz is a good product for cleaning the grinder since this one is a little harder to get in and clean than standalone grinders. 

Conclusion:

If you’re looking for an all in one package with a small form factor to get into home espresso it will be hard to find anything better than these options from Breville. I personally think the Breville Barista Pro is the best option since I like steaming my own milk and like the LCD interface. 

I really wish the built in grinder was better, the retention is really high and it’s quite difficult to clean. I’ve ended up purchasing a 1Zpresso J-Max hand grinder to really refine my coffee grind size for espresso (this is an excellent grinder if you’re willing to put in the work of hand grinding). There a lot of options for standalone grinders, but if that’s your plan you should look at buying a dedicated espresso machine without a grinder like the Breville Dual Boiler and pair it with an Eureka Specialita or similar stepless espresso focused grinder. As the name suggests the Dual Boiler has two boilers and allows you to steam and make espresso simultaneously. These other products don’t allow you to do that, you have to pull you shot first then steam your milk. The Dual Boiler also has the advantage of using a 58mm portafilter, which is the industry standard size, whereas the Express, Pro and Touch use a smaller 54mm portafilter. 

Overall, I’m happy with the purchase and would recommend the Breville Barista Pro to people wanting to make home espresso, especially if they will primarily make milk based drinks. For the difference in price I believe the Pro is worth it over the Breville Barista Express. The Breville Barista Touch is harder to justify its price increase unless you want automatic milk steaming and the touch screen interface. 

One of the disadvantages to a Breville machine is that replacement parts are hard to find outside of the warranty period. If you look up parts for the Rancilio or Gaggia you can find pretty much every single part and keep the machine going for decades. A Breville machine will eventually need to be thrown out once support ends and you cannot locate parts anymore. I talk a little about super-automatic espresso machines here, but the coffee/espresso they produce tends to be lower quality than using a semi-automatic primarily due to grinder limitations on those machines.

Milk Steaming Videos:

Puck Preparation Accessories:

Other Accessories:

Manual for the Breville Barista Pro or Sage BES878 in the U.K.

How to Make Better Coffee. 10 Easy Steps to Improve Your Coffee.

While doing research for my posts I noticed that a lot of people have the right equipment to make great coffee, but aren’t following the right process to make great coffee. If your process works for you, then keep it, but if you think you have room for improvement, here are some suggestions:

  1. Buy better coffee, but better doesn’t mean more expensive. Great coffee doesn’t need to cost a lot, it just needs more thoughtfully sourced. For less than the price of coffee pods, you can get amazing specialty coffee. Read our full guide on buying coffee and also our guide on green/specialty coffee. Fresh and locally roasted whole bean coffee consumed 3-18 days (generally) post roast will have peak flavor. That doesn’t mean coffee is undrinkable after that, but I would not buy coffee that is over one month post roast. If your coffee doesn’t have a roast date and only a “best by” date, then don’t buy it. For this reason I don’t recommend buying coffee online unless it is from a specialty roaster with recent roast dates, otherwise you could be getting coffee that is months old. Explore light and medium roast coffee as that is where most of the origin flavor will come out, the darker you roast coffee the more they all start to taste the same. If you have the time, roasting your own coffee can be the most economical (and fun) way to get fresh specialty coffee, learn how here.
  2. Brew with quality water. Brewed coffee only has two ingredients being water and coffee, so make sure you are using good quality water. I use tap water for my coffee, at a minimum I recommend you run your water through a pitcher filter. You can get a decent under sink filter for pretty cheap also. What I use is this under sink filter which connects directly to my faucet. The filtration is good, and I don’t suffer a reduction in flow rate like you do with the other types of under sink filters and reverse osmosis system, these systems will do a better job with filtration, but have limitations such as using more water or having to have a second faucet with low flow rate. If you live in an area with hard water, it might be worth considering a water softener for your home, it will help with more than just better coffee, but help with soap scum and washer and dishwasher efficiency. If you really want to get crazy you can buy distilled water and add these Third Wave Water mineral packets for what they claim to be the optimal blend for coffee, I haven’t tried this as I really don’t like buying bottled water other than for emergency use.
  3. Measure your coffee by weight. This one is huge, I wish coffee companies would stop recommending using scoops and cups to measure coffee. See our coffee recipe charts for information on how to dose coffee and check out our post on why we should measure by weight. Also check out our recommended kitchen scales.
  4. Grind your coffee as close to your brew time as possible, preferably right before you brew. Coffee needs to be ground in an even and consistent manner for best results, blade grinders do a bad job at this so it is recommended that you get a burr grinder. I have a friend with a good coffee maker and a good burr grinder and was buying whole bean coffee and grinding the entire bag at once for the week, this is not recommended. For this reason, do not buy pre-ground coffee as it starts to become stale right after grinding. Now, the other day I had to wake up at 4am, so I ground my coffee the night before and put it in the coffee maker with a dry filter paper and scheduled a 4am brew so I didn’t have to wait for it.
  5. Adjust your grind size. Not all brewing methods use the same grind size, not all coffee types use the same grind size. Even between the same exact model, two grinders may not produce the same grind size. You could be using the same brew method with the same coffee beans and need to use a different grind size due to the size of the brew. For example with pour over, everything else being the same if you are brewing a smaller batch you should grind finer, and if you are brewing a larger batch you should grind coarser. These may just be one step difference in either direction, but the recommendation is keep grinding finer until the bitterness starts to come through, then adjust it back coarser for optimal extraction. If your coffee is coming out too weak or sour, that likely means you are grinding too coarse and should grind finer. For most brew methods, grind adjustment should be your primary method for modulating taste, not adjusting the ratio or other factors.
  6. If you are using filter paper, rinse it with hot water first. This can be hot tap water if you don’t have a water warmer or extra water from your kettle. You’ll get better results from bleached/white filters papers than the natural/brown ones. The brown ones are compostable which is good, but the white ones have less paper taste and are are bleached using a process called oxygen bleaching and are safe to use. Many coffee makers come with reusable screen filters, however I find that using paper filters has the best results, if you are worried about waste you can also try a cloth filter. As I mentioned above, only rinse the filter if you are going to brew right away, if you are setting an auto brew then leave the filter dry. This will also help to pre-warm your brewer which many people suggest.
  7. Use the right brew temperature. Another huge one. For a home coffee brewer, the Specialty Coffee Association (SCA) recommends a brew temperature between 197.6F and 204.8F or 92C and 96C. For methods like pour over, French Press, AeroPress, Hario Switch and Clever Dripper, we recommend you use water that is fresh off the boil. You can save yourself money on buying a kettle without variable temperature and just use water fresh off the boil. If you are using a coffee maker, you can try to measure your brew temperature as close to the source as possible with a probe thermometer. Water loses temperature very fast, when I was testing coffee makers sometime I would think something was off with the temperature because I would run a brew without coffee or filter into the carafe, and by the time I tested the water after a brew it was 15-20F colder than what I measured when it was coming out of the filter basket. I would say, if your coffee maker is putting out water more than a few degrees lower than 190F, may be time to consider a new brewer. We have reviewed many brewers, both SCA and non-SCA certified, check out our recommendations here
  8. Stir, not swirl, before drinking. I know it sounds like a cheesy James Bond quote, but it does make a difference. Coffee tends to stratify during the brewing process. Swirling doesn’t work as well as stirring with a spoon or stick to eliminate the stratification. Some coffee makers like the Ninja or Moccamaster have a brew straw or tube in the carafe to prevent stratification, but most don’t.
  9. Try the coffee black first. Especially with fresh roasted specialty coffee, drink it black before adding milk, dairy alternative or sugar. You may be amazed by some of the notes and aromas you will get. Also, if your coffee is too hot you may not be able to taste it properly. Coffee may taste better between 122F and 129F or 50C to 54C, so try to drink it as it cools a little. If you are fancy you can get an Ember Mug to keep your coffee at an ideal temperature, or worst case you can microwave your coffee to reheat it. A thermos is a great way to keep coffee warm, but I know some people don’t like the feel of drinking from a thermos vs a mug. We don’t recommend keeping your coffee on a hot plate as it will cook your coffee and the taste will suffer, for this reason we recommend a good thermal carafe or that you transfer your coffee off a hot plate within 20 minutes.
  10. Take good care of your equipment. With the exception of grinder burrs (just use a dry brush for these and never wet them), you can hand wash most of your coffee equipment, such as your carafe, filter basket, french press and pour over drippers with mild soap and water. Clean your grinder regularly, use a dry brush and/or an air blower to clean out all the grounds and burrs. If you are using super dark and oily coffee (which we don’t recommend), you can try grinder cleaning tablets. Make sure to descale your coffee maker regularly with white vinegar or descaling solution. I like to keep the filter basket holder and shower head on my coffee maker open to promote faster drying. Even your Moka Pot should be hand washed with mild soap and water, many people believe you should not wash these with soap similar to what people said about cast iron skillets. Never place aluminum, like a Moka Pot, in the dishwasher because dishwasher soap is different than regular dish soap and will cause aluminum to oxidize and damage/discolor it. Random fact, for those of you who were taught to never use soap on a cast iron skillet, the guidance is now that it is ok to use soap and water with a cast iron skillet. Don’t believe me, see for yourself.

One last tip – Take notes. I know this sounds crazy to some people, but use your phone or take down some notes on the coffee and what you thought. Did I like this roast level? Did I like this origin? Should I adjust the grind the next time I brew this coffee? Only change one variable at a time to dial in your best brew, for example don’t change your grind size and change the ratio at the same time. Coffee is very personal and there is no right answer to what is the best coffee. I tend to really like coffee from Africa and Central America. Someone else could really like coffee from Indonesia and South America, so try different kinds and keep notes as to what you like. 

  • See our guide on how to pick the best brew method here.
  • See our coffee recipe charts here.
  • Check out all our recommendations here.

How to Make [Non-Muddy] Coffee with a French Press

The French Press gets a bad reputation for being difficult to clean and making muddy coffee, but it’s a great immersion brewer that is low cost and easy to use if you do it right. We tested the OXO Brew French Press with GroundsLifter with our brew method and recommend it. If you look at recipes for French Press, you will find a lot that say different things, we have tried many of them and found this combination of different methods to be our favorite. This method will give you a nice clean cup and is easy to clean up.

Here is what you will need:

Here are the instructions:

  1. Boil the water in your kettle.
  2. While your water is warming, using the recipe sheet and on the resources page, grind your coffee by weight to a medium ground. The recipe sheet is based off of 60 grams of coffee per liter of water, however for French Press you can go as high as 75 grams of coffee per liter of water. For our example we use 42 grams for 700 ml of water. You can adjust to ratio between 1:13 to 1:17.
  3. Pour the ground coffee into the French Press.
  4. Start your timer and add 2-3x the weight of the coffee in boiling water, swirl and stir to ensure all the grounds are saturated then wait for 30-45 seconds.
  5. Pour the remaining water.
  6. Swirl again and allow the brew to steep for a total of 4:00.
  7. At the end of 4:00 all of the particles should have fallen to the bottom, place the lid on the French Press and plunge only to the surface of the brew. You don’t want to plunge all the way down as it will stir up all the coffee.
  8. Gently pour the coffee trying not to cause the grounds at the bottom to stir up, between pours you may need to plunge down just to the surface again for faster flow.
  9. Do not wash coffee grounds down your drain, you can throw them in the trash or use them for compost. If you don’t have the OXO, then pour the grounds into a sieve/strainer then discard or compost them.

If you’re looking for an immersion brew method with a filter, check out the Clever Dripper or AeroPress.

How to Make Coffee with a Clever Dripper

The Clever Dripper is another brewer that combines the immersion brew method with a paper filter. They allow for larger brew sizes than the AeroPress, and like the AeroPress, are also very forgiving. You can make about 12 ounce of coffee easily. It looks like a pour over dripper, however there is a leak proof valve at the bottom that will not begin the draw down until it is placed on a mug or carafe. Also see our brew guide and review on the Hario Switch, which is very similar to the Clever Dripper, but can also be used to make pour over coffee.

Things you will need:

Here are the instructions for making coffee with a Clever Dripper:

  1. Boil the water in your gooseneck kettle.
  2. While your water is warming, using the recipe sheet and on the resources page, grind your coffee by weight to a medium/fine ground, similar to table salt. I would use a maximum brew size of about 400 ml, so for this example we will use 24 grams of coffee for 400 ml of water.
  3. Fold the #4 Cone Filter at the two seams to assist with better seating in the dripper
  4. Do not place the Clever Dripper on the carafe at this time, place it on your counter or scale.
  5. Rinse the filter paper and warm the dripper. Dispose of the water.
  6. Place your Clever Dripper directly on the scale (without the carafe) and tare to zero.
  7. First pour in 400 ml of fresh off the boil water.
  8. Second add the 24 grams of coffee and stir until fully saturated.
  9. Allow the coffee to steep for 2:00.
  10. At the end of the steep stir the crust. You can wait another 30 seconds after the stir if you want.
  11. Place the dripper on a carafe to begin the draw down into a carafe, this should take about 1:00.
  12. Stir the coffee before serving.

Check out our post about the AeroPress here, another great option for single servings and travel.

How to Buy Green Coffee and Decode Specialty Coffee Labels

After the post about how to roast your own coffee with an air popper, several people asked me how to buy green coffee? Many of the things to look at when buying green coffee are the same as buying single-origin coffee (check out my post on buying roasted coffee). The first time you shop for green or specialty it can be a little overwhelming. Green coffee and specialty coffee labels may contain some combination the following:

  • Country of Origin
  • Region
  • Processing Method
  • Farm, Estate or Processing Station
  • Size or Grade
  • Variant or Cultivar
  • Elevation or if Shade Grown

Check out this page for a great graphic of coffee types, needless to say there are a lot. Usually they don’t make it into the label though, but if you dig into the descriptions online they may show up.

I won’t dive into all aspects of this because it would be a super long post, but if you’re interested to learn more about all things coffee a great book is the World Atlas of Coffee by James Hoffmann that breaks down the different areas around the world where coffee is grown and just a really great baseline for about all the brewing methods.

It’s important to note that coffee is an agricultural product and like any agricultural product there are harvesting seasons and variation. Wine is similar, sometimes there are good years, bad years, good harvests and bad harvests. There is an entire industry dedicated to sourcing green coffee as coffee is the world’s 2nd most traded commodity behind petroleum products.

Similar to wine, coffee is very personal. What one person likes the other person may not. Some people prefer more floral or tea like flavors while others people want bolder coffee or chocolate notes.

Let’s breakdown some examples of green and specialty coffee names.

Ethiopia Guji Hambela Dabaye

  • Country of Origin: Ethiopia
  • Region of Origin: Guji
  • Processing Station: Hambela
  • Kebele (Municipality of Ethiopia, similar to a town): Dabaye

Costa Rica La Minita Estate Tarrazu Washed

  • Country of Origin: Costa Rica
  • Region of Origin: Tarrazu
  • Estate/Farm: La Minita Estate
  • Processing Method: Wet Processed or Washed

In the above example you will notice the name will sometimes include if it is Wet Processed (Washed), Dry Processed (Natural) or Honey Processed. While not always the case, usually dry processed coffee will indicate that it is dry processed, otherwise most of the time if it is not indicated you can assume it is wet processed. You’ll also notice there isn’t a standard convention to put the estate or region in any specific order.

You can read more about the different processing methods here. Try out the different types and see which ones you like. Dry processed coffee tends to be described as more floral or wild tasting. The latest trend is Carbonic Maceration and Anaerobic Fermentation which you can read more about here, I haven’t tried either.

Decaf has its own types of processing, try to pick one that is Swiss Water Process (SWP) or Mountain Water Process (MWP) which doesn’t use chemicals like they do in the other processes.

Sometimes it will include the size or grade such as 17/18, AA or Supremo which refers to the diameter of the bean. There is a good article about it here that breaks down how different areas have different terms. Specialty Coffee means it has met standards which you can read about here. You may hear the term Third Wave Coffee used, but there is no agreed upon definition of that like there is for Specialty Coffee.

Here are some other acronyms you may see:

  • FT: Fair Trade
  • FTO: Fair Trade Organic (I mentioned in this post that it isn’t necessary to buy organic coffee)
  • RFA: Rain Forest Alliance (read more here)   

Here are the two main sites I buy green coffee from, because I really like their detailed notes and instructions:

  • Burman Coffee Traders is recommended a lot, but I haven’t tried them yet. Will update the post when I do.

These sites also sell some roasted coffee so you can buy some and see how your home roasting compares to theirs. Add about 25% to the cost of green coffee if comparing to roasted coffee prices to account for the roughly 20% weight loss in the roasting process.

Hopefully this crash course has helped you to decode some of the green coffee and specialty coffee names, below you will see all the different types of coffee I have bought green and roasted myself. There is not a single one that I thought was bad after I found the right grind size, the ones in bold are the ones I particularly enjoyed and would purchase again (if it was in available). You’ll notice some don’t have the processing station or farm on them, that is because they were purchased from a larger supplier that didn’t break it down that far. Since then, I have tried to source only fully traceable green coffee. I could have made this post a lot longer, but as with my other posts, I take a lot of information and try to condense it for easier reading with links throughout if you want to read more about it.

  • Colombia Sierra Nevada FTO Washed
  • Ethiopia Shakiso Guji Dry Process
  • Ethiopia Guji Hambela Dabaye
  • Ethiopia Guji Uraga Yabitu Wet Process
  • Guatemala Acatenango Gesha Lot 2*
  • Ethiopia Yirgacheffe Washed FTO
  • Costa Rica La Minita Estate Tarrazu Washed
  • Ethiopia Sidama Shantawene Village
  • Panama La Esmeralda Gesha 1500*
  • Indonesia Bali Blue Moon Organic
  • Colombia Supremo 17/18 RFA
  • Ethiopia Guji Shakiso
  • Ethiopia Yirgacheffe Aricha Washed
  • Ethiopia Yirgacheffe Dumerso
  • Ethiopia Dry Process Guji Hambela
  • Panama Dry Process Paso Ancho
  • Ethiopia Sidama Damo
  • Guatemala Proyecto Xinabajul Chalum
  • Costa Rica Helsar Macho Ave
  • Rwanda Dry Process Ngororero
  • Colombia Pavon Finca Los Palomos
  • Ethiopia Sidama Shantawene Village
  • Kenya Kiambu Evans Farm AA

Like I said, coffee is very personal and you can see some recurring themes here. I tried Yirgacheffe and Sidama from a local roaster and still felt that I also enjoyed the Yirgacheffe more than the Sidama. However, my wife really likes the Sidama so everyone will enjoy different things. This article really dives into the different types of coffee.

*Quick note on Gesha (alternate spelling Geisha) coffee, which you may have already heard of. If you have heard of it, you know it is very expensive, around $30-50 per pound for roasted coffee. The green coffee sites I use had some for about half that price so I thought I would try it out. It was great coffee, very floral and almost tasted like black tea, but I didn’t think it was twice as good as some of the other Ethiopian (also known for floral notes) beans that I roasted, so I wouldn’t necessarily purchase them again unless I was planning a nice gift for a coffee lover.

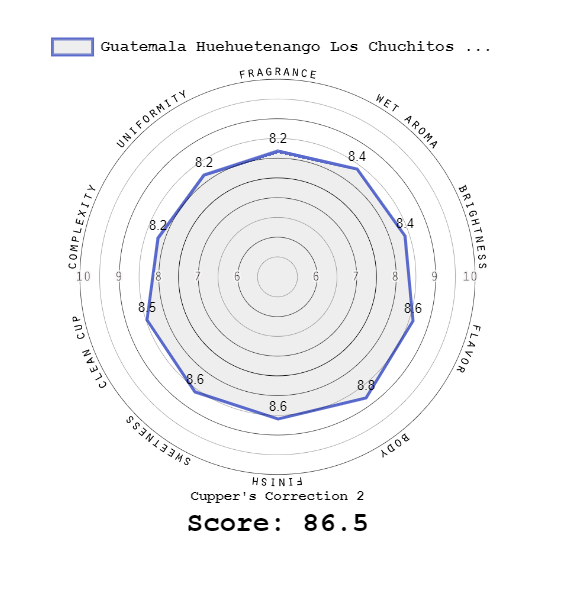
Sweet Maria’s has particularly robust notes on their green coffee so I encourage you to check out the different tabs for Overview, Specs, Farm Notes and Cupping Notes.

Coffee needs to be shipped to its final destination and the way it is packaged is important, the industry standard is a GrainPro Liner which will keep the coffee fresh and keep bugs and pests out, so that is something you can check on also although most sourcing channels will use this type of packaging. Green coffee can last quite a while when shipped and stored properly, it is roasted coffee that we really need to watch the dates on.

Here are some examples of the graphical representations you can find on Sweet Maria’s site. You can look for notes you like in your coffee.

How to Make Cold Brew Coffee

If you search for how to make cold brew online, you will likely find about 10 different methods. I’ve probably tried all 10 and found this method to work best. Remember, we always prefer to use weight over volume for our coffee recipe. In another post I wrote a quick set of instructions for making cold brew, but I’ve been asked about this lately so figured it deserved its own post with more detail.

One thing to mention is that cold brew coffee is not iced coffee. Iced coffee is brewed hot and allowed to cool or brewed over ice to make it cold. The hot brew method extracts differently than the cold brew method. Cold brew is generally less acidic and has a more neutral taste. Iced coffee will have more of the notes that are specific to the bean and also uses less coffee.

One of the most important things about any coffee brewing is the grind size, grind too coarse and it tastes sour, grind too fine and it tastes bitter. However with cold brew we usually add water, milk or ice to suit our taste so that helps neutralize that. This is one brewing method where you don’t need to use your best and freshest beans, for many this is actually the way they use up stale beans without wasting them. Cold brew is also somewhat of a coffee hog in that our normal ratio is about 1:17 and we use 1:8 with cold brew so it requires a lot more coffee.

Cold brew is easy to make in large batches and can be kept in the refrigerator for up to two weeks.

Here is what you will need, you’ll likely already have some of this around the house. There is no need to buy a cold brew maker, unless you really want to.

Here is the process:

  1. Use a medium-coarse grind (around an 10 with my OXO Grinder) with a 1:8 ratio of grams of coffee to milliliters of water. You can use a larger vessel, but I usually use a 32 oz. mason jar and use about 94 grams of coffee and 750 ml of water. Give it a stir/shake to mix the water and the grounds.
  2. Let it steep in the refrigerator for 16-24 hours. Give it a stir/shake a couple times during that time.
  3. Use your metal coffee filter or sieve to remove all the coarse grounds while pouring into another vessel, I usually use a large measuring cup for easier pouring.
  4. After all the large grounds are out run it through a paper coffee filter. This may take a while, I usually pour half through a paper filter, then use a new filter for the second half. Lately, I have been using my V60 dripper and filter that I use for pour over coffee.
  5. Add water, ice or milk to your taste preference. Store it in the refrigerator.

Another way to do this is to make cold brew concentrate using the same method and a 1:4 ratio of grams of coffee to ml of water. Then you can add an equal part of water, milk or ice to taste.

Home Coffee Roasting with an Air Popper

If you want really fresh coffee you can buy from local roasters or just roast it yourself. This is a lot easier to do then it sounds. First thing you need to do is to get yourself an electric popcorn maker, the Nostalgia one pictured is a good option. If you buy it from Sweet Maria’s for $20 it will include 4 pounds of green coffee for you to roast, this is a great deal because normally the popper alone around $20 at retailers.

Below is what you will need, hopefully you already have some of this at home. There is a video below, but I always learn better when I can read the steps and then watch the video.

At its basic meaning roasting is the application of heat, you can apply heat to coffee beans many ways. Here are some other methods to roast coffee you can read more about online, but I think using the air popper is the easiest (and cheapest). Most people outgrow the air popper mainly because they want bigger batch sizes or more control over their roast.

Coffee pops or cracks when roasting, twice actually. The time it is called First Crack and it is louder and more pronounced, the second time is called Second Crack and it is a little quieter and faster.

In the coffee roasting world there are different terms for roast levels than what you are used to seeing. There are more than these, but I will focus on the most common ones and the ones in my comfort zone for roasting.

  • City Roast – At or near the end of First Crack, City + Roast allows for a little more development –420-430F – This would be called a light or medium roast
  • Full City – Right Before/Beginning of Second Crack, Full City + is when the second crack is “rolling” or popping regularly (think of microwaving popcorn, this isn’t the first outliers this is when it is really popping quickly) – 430-440F – This would be called a medium or medium-dark roast

The temperatures are approximate and you will see different guides vary a little. For my purposes I try to end a City Roast around 426F and a Full City Roast around 437F.

The coffee roasting process will create a lot of smoke and chaff (coffee skin) that flies all over the place. Because of this I almost always roast outside. Read below for tips on roasting indoors.

Many of the professional drum roasters have sensors and settings for temperature, heat, drum speed, air flow and many other things can be tracked and adjusted on the fly. With an air popper we only have on and off so we are limited (there are videos out there to show you how to mod these things, but I don’t mess with that) in our controls. The main things we have is to go off are sight, sound, smell and temperature, that is what the laser thermometer is for, so we can measure the center of the bean mass.

Here is some more information about roast levels and roast data. Here is also a handy roast card.

Ok, that was a lot of background info so let’s start the process. Please read this entire post before your first roast, things move pretty fast and you won’t have time to read as you go. The total roast times for an air popper can vary between 4-7 minutes. Coffee roasting is a fire risk, always watch your roast and never leave it unattended.

Below is a video of the process, I don’t check the temperature or agitate as much as normally would to get you a better view of the roast progression. Click here for the non-narrated version if you don’t want to hear me talk.

  1. Read the description of the green coffee, if you buy from Sweet Maria’s or Happy Mug it will have some great roasting and tasting notes on it. Determine what your target roast level is. City, City+, Full City or Full City+ unless the bean specifically calls for something darker than this, I wouldn’t go darker than a Full City + roast. When you go that dark you really start to lose the aromas and notes in the coffee and just get bitter Starbucks-like coffee.
  2. Measure your batch size with a scale, I recommend between 2.5 and 3.5 ounces. I usually roast about 3.2 ounces per batch, because I am buying 1 and 2 pound bags and that will get me 5 or 10 even sized roasts out of the bag.
  3. Pre-warm your air popper, I usually warm it for a couple minutes until about 330F. The pros use environment temp (ET) and bean temp (BT) probes. We don’t have a good way to track the ET in an air popper, but the BT can be checked with our laser thermometer.
  4. I roast in a warmer climate so I always leave the lid off of my air popper to prevent the ET from getting too warm. You should only do this if roasting outdoors.
  5. Turn on your timer and pour the beans into the air popper and agitate about every 5-10 seconds, I hold the lip of the air popper where it doesn’t get as hot and agitate the beans in a vertical motion to try to get the beans to cycle from top to bottom and bottom to top to promote even roasting. I keep doing this until the beans are moving freely on their own. I still agitate a little when the beans are moving and cracking every 30 seconds or so, sometimes more if I feel the beans are spinning and not necessary moving from bottom to top.
  6. As the roast is progressing the beans are losing weight and you will notice drying, yellowing, smoke and the smell changes. At this point chaff may be flying everywhere, this is when I take my cheap fan and turn it on to blow all the chaff away from me and also keep the ET a little lower with the airflow. Coffee will lose about 20% of its weight during roasting.
  7. Soon you will hear your First Crack, then first crack will start rolling (think popcorn), the earliest I recommend ending a roast in an air popper is when first crack ends, where it has stopped or slowed down to less than one pop every 10-15 seconds.
  8. I usually roast about 30-45 seconds past the end of first crack since lighter roasts levels are harder to do well on an air popper due to the lack of controls. Bean temp will be around 430F.
  9. If you choose to go to second crack you will hear that as well and can decide to end the roast right when it starts at a temperature around 440F. I try not to let second crack go into rolling unless the notes suggest it.
  10. At this point when you are ready to end the roast turn off your timer and air popper and pour the beans into your sieve. Place the fan under your sieve and start transferring the beans between the two sieves while the fan is blowing under them. This will help cool the beans and blow away any residual chaff. You want to do this until they are cool enough to touch with your hands.
  11. At this point go through and discard any deformed and empty looking beans and pour them back into your cupping tray or a pan for more cooling.
  12. Take notes about your roast after and/or during your roast. Record the type of coffee, the date, the temperatures, when was the first crack, what was your roast level (I’ll note something like First Crack +30), what was the finish time of your roast so in the future you can have a baseline for when you taste it. Maybe next time you want to roast a little lighter or darker however don’t get stuck on your roast times with an air popper, trust your sight and smell to know how your roast is progressing.  
  13.  Factors like the type of beans, ambient temperature, humidity, level of agitation will all impact the roast time so it may vary between roasts even when all other factors are the same. I have two Nostalgia air poppers I use and the red one roasts faster than the blue one, even though they are the exact same air popper from the same company just in different colors.
  14. Some roasters suggest that coffee needs to degas for at least 12-24 hours before you can brew it. Do not store them in an air tight container for the first 12 hours, you can put them in a mason jar (out of sunlight), but don’t screw the lid down all the way.

You can do another roast after this, but I would not recommend doing more than 2-3 roasts without letting the air popper cool down completely (which is why I have two). Also, roasting coffee in your air popper will void the warranty, but for $20 what did you expect?

There are videos out there of how-to mod the power levels on your air popper, I don’t recommend doing this. If you think the power level is too high you can try using a long extension cord or power strip to try and reduce the power level. You can try to pry the air vents to open more for increased airflow, but I haven’t tried this.

If you live in a cold climate, it may not be possible to roast outdoors. You can try to use the lid to keep the warmth in or build a small enclosure to keep the warmth in roasting outdoors. If you are doing this indoors make sure you have really good ventilation, open windows, run a fan, roast under a range hood if possible. To control chaff, use the air popper with the lid and aim it at your sink (spray the sink down a little so the wetness will cause the chaff to stick) or you can also do this with a large pot or bowl.

Congratulations, you have roasted your first coffee. It will be hard to wait the 12-24 hours before you can grind and brew it, but it will be worth the wait.

Now that you’ve roasted your own coffee check out some other posts on how to improve your coffee experience:

How to Buy Coffee

There is a ton of information out there on this topic, in the spirit of my blog I’m just trying to give you the summarized version. This post talks more about how to make sense of specialty coffee labels.

Don’t buy pre-ground. Don’t do it. You already have the burr grinder and scale I talked about in the must haves post. Coffee is all about freshness, you want fresh roasted coffee beans that you grind fresh right before brewing. This is another reason not to use pods, all that coffee is stale and pre-ground, not to mention overpriced.

The peak flavor for coffee is between 3-18 days after roasting, maybe up to a month. I was at my local organic type supermarket the other day and saw a bag of “premium” coffee and the roast on date was over 2 months ago. Notice I said peak flavor, this doesn’t mean coffee is undrinkable outside of this range, but that most agree this is when coffee tastes best.

Coffee tastes best if brewed within 30 minutes after you grind it, so combine the fact that not only is your coffee going to be 2 months old, it will have been ground 2 months ago. At this point, who cares about freezing, vacuum sealed containers or whatever storage method you use, you’re just preserving staleness. If time is an issue in the morning, grinding your coffee the night before and setting a timer on your coffee machine is just fine, it will be vastly better than any pod or pre-ground coffee you would use. I would not advise using the supermarket grinder though, even though it’s just a week that you’d be using it, grind as close to brew time as possible.

If your coffee only has a “best by” date and no “roasted on” date, stop buying it. Simple as this, if they aren’t willing to tell you when it was roasted, it isn’t worth buying.

Try to buy single-origin or single-estate coffee. Lately there is a lot of focus on sustainability and traceability of coffee. You want to be able to know who grew your coffee, where they grew it, how it was processed, how it was shipped and when it was roasted.

Also to know that in every step of the way things have been done in an ethical and sustainable way from fair wages to use of chemicals and pesticides. Coffee is so much more complex than light, medium, dark or french roast, which is the only information you find on most supermarket coffees. Most of what you see out there are blends of coffee beans, while there are some great blends out there from specialty roasters, the supermarket brands use this method to mix low quality beans with average quality beans to give you average tasting coffee. If you find a great local roaster that has both single-origin and blends, I’d say those blends are better than any supermarket blends.

It doesn’t really matter if you buy organic coffee. Many of these small producers are already using organic methods, however to get the organic certification will cost them thousands of dollars, which oftentimes is out of reach or money better spent elsewhere. If you are buying responsibly sourced single-origin coffee I wouldn’t worry if it is labeled organic or not.

Avoid coffee with flavors and additives. Coffee can have some amazing notes, but when you see flavored coffee, that means artificial flavors have been added during the roasting process. Flavors like french vanilla or hazelnut are artificially added, even by some very popular and successful coffee shops (*cough* Philz *cough*).

Explore light and medium roasts. We have been conditioned over the years to think that dark roasted and bitter coffee is “strong” or “bold” (thanks Starbucks) when in reality this is the way the big producers ensure uniformity. Not to say there aren’t some great specialty dark roasts out there, but usually the more you roast a coffee bean the more uniform and bitter it tastes, which means you can use lower quality beans to achieve this. A lot more of the tones and flavor comes out in light and medium roasts, try it without milk or sugar first and see if you can taste them. Also light roast coffee has more caffeine than dark roasted coffee, contrary to popular belief than darker is stronger. Vienna, French and Italian are all dark or darker than dark roasts.

When you find that great local roaster, try the light and medium stuff first and give them feedback and see what they recommend. Usually when I asked people what kind of coffee they like, they answer with medium or dark roast, but coffee is so much more complex than that. Country of origin, geographic region, bean type, growth elevation, processing method and so much more.

Buy from local coffee roasters. Not only are you supporting your local economy this is one of the best ways to ensure you’re getting fresh roasted coffee. They should be able to tell you when a coffee was roasted and offer different types of single-origin and roast levels. There are also many small and independent roasters all over the U.S. that will ship you coffee that is roasted to order or roasted in the past few days.

Or…. Roast your own coffee. Learn how here.

How to Make Pour Over Coffee

The first time I saw pour over was at Blue Bottle in San Francisco, seemed like a cool way to make coffee. After a lot of research this is now my go to morning coffee process. It seems like a lot of work, but once you get the hang out it, it only requires a few minutes of your attention.

I like pour over because you can make some of the best coffee with a relatively low-cost method, you can get a great pour over setup for under $100, less if you have some of the items at home already. If you go down the rabbit hole of espresso you will quickly realize to get the best results requires a lot of investment in time and especially money. To do espresso properly requires at least $450 for a semi-pro machine and $280 for a good espresso grinder at the higher end you’re looking at $3000 machines and $680 grinders.

Things you need (there are links to the items in this kit on the recommendations page):

This is the James Hoffman technique, there is a video I made down below of the process, I have written it out with some additional detail. I know it seems long and complex, but after a few times it becomes second nature and only requires a few minutes of active attention. I mention this because I can do this with two toddlers screaming for breakfast, so I think most people can manage this. If the times and amounts are a little off, that is ok.. you will refine the process to make it work best for you.

  1. Boil the water in your gooseneck kettle, use filtered (preferably soft) water that is freshly boiled, not water that has been sitting in a warmer.
  2. While your water is warming, using the recipe sheet and on the resources page, grind your coffee by weight to a medium/fine ground. If your coffee comes out too bitter, adjust the grind coarser. Adjust finer if it lacks flavor. Ideally keep going finer until it becomes bitter then adjust it coarser again to ensure optimal extraction.
  3. Insert and rinse the V60 filter paper in your dripper using hot water from your kettle or I use a Zojirushi hot water warmer to do this (the kind I told you not to use for the brewing the coffee), if I am making larger batches sometimes my gooseneck won’t have enough water to rinse the paper and make the coffee. This cleans out any paper taste and also heats up the dripper and carafe. Dump the water after the rinse.
  4. Set your carafe, dripper and wet paper on the scale and tare it to zero then pour in your ground coffee and confirm the amount. It could be less than you put into the grinder due to grinder retention, if it is a gram or two off, I wouldn’t worry too much. Give your dripper a little shake to level out the grounds. Tare to zero again before pouring water.
  5. For this example let’s use 30 grams of ground coffee in your dripper and 500 ml of water, since one ml of water weighs exactly one gram so I use them interchangeably. With your scale at zero, start the timer and pour in a circular pattern 2-3 times the weight of coffee with your freshly boiled water. So 60-90 grams of water for the bloom. Give it a gentle swirl and let it saturate for 45 seconds. This is called the bloom, it helps to release gas and wet the grounds.
  6. Your timer is now around 0:45, within the next 30 seconds pour in a circular pattern approximately 60% of the water. So we want to hit 300 grams by the time the timer hits 1:15. Try to pour the flow to agitate the grounds sufficiently without creating channels in the coffee bed. Some will say don’t pour on the paper, but I think it is ok and I do it to get grounds that are stuck on the paper back into the slurry.
  7. Continue pouring the rest of the water with the goal to finish within the next 30 seconds, around when the timer hits 1:45. After all your water is in take a spoon and give it a gentle stir clockwise and another one counter-clockwise. Once the water level drops down to safe level give it another swirl to flatten out of the coffee bed. Throughout these pours we want to retain as much thermal mass in the dripper as possible, so try not to let the water draw down too much while pouring.
  8. Now let the coffee draw down fully, which should finish at about 3:30. Give the coffee a stir (not swirl) in the carafe before pouring. If your drawn down is much slower or faster than 3:30 try to adjust your grind size finer if it is too fast or coarser if it is too slow.
  9. Try it without milk or sugar first after it cools a little, see if you can detect any notes. If you want to add milk or sugar, you can do so, but try to get a taste of the coffee black first.
  10. If you want to nerd out, use your phone to take down some tasting notes on the type of coffee and if you like it, or if next time you should adjust the grind or whatever comes to mind. Coffee is personal, like wine or food, some people love certain types and others hate it, it is all personal preference.

They make machines that try to replicate this process so you can put in your coffee and just press a button and go. I know people that like them, but I enjoy the process of making it this way. If time is an issue, they may be good to look into. Check out our blog post about how to roast your own coffee at home here.