Stop the Scoop

One thing I’ve mentioned numerous times throughout my blog is that coffee should be measured by weight using a scale. Coffee beans come in different sizes, weights, moisture content and density so using a volume measurement such as a tablespoon or nondescript “scoop” doesn’t tell us much about our coffee recipe. Green coffee loses about 20% of its weight during roasting and there are a lot of factors that can impact the final weight.

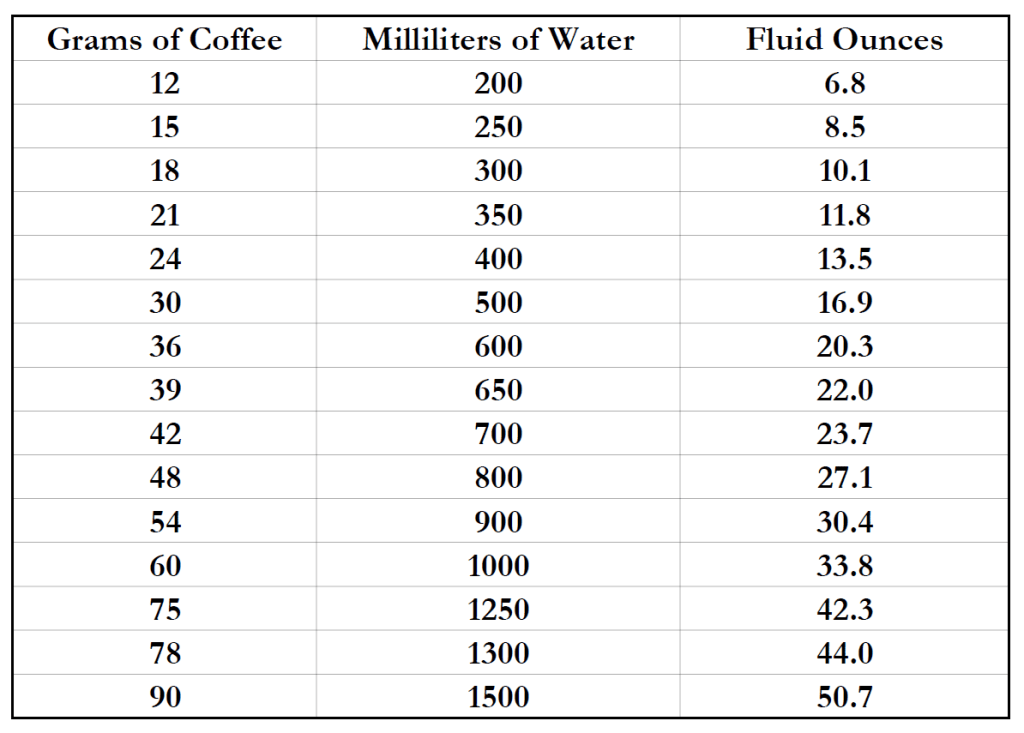
The standard for measuring coffee is grams of coffee to milliliters of water. For drip, pour over and filter coffee the mostly widely recommend ratio is 1 gram of coffee to 16.7 ml of water (based off 60 grams coffee per liter of water or 30 grams for 500 ml). Recommended ratios can vary from 1:15 to 1:18, but the best way we can modulate our coffee taste is to adjust the grind size not to adjust the ratio. Since one milliliter of water weighs exactly one gram this makes doing pour over on a scale easy, take the amount of coffee you have multiplied by 16.7 and that is how many grams of water you need to pour. Or take the amount of water you want to use in milliliters and divide by 16.7 for how much coffee to use.

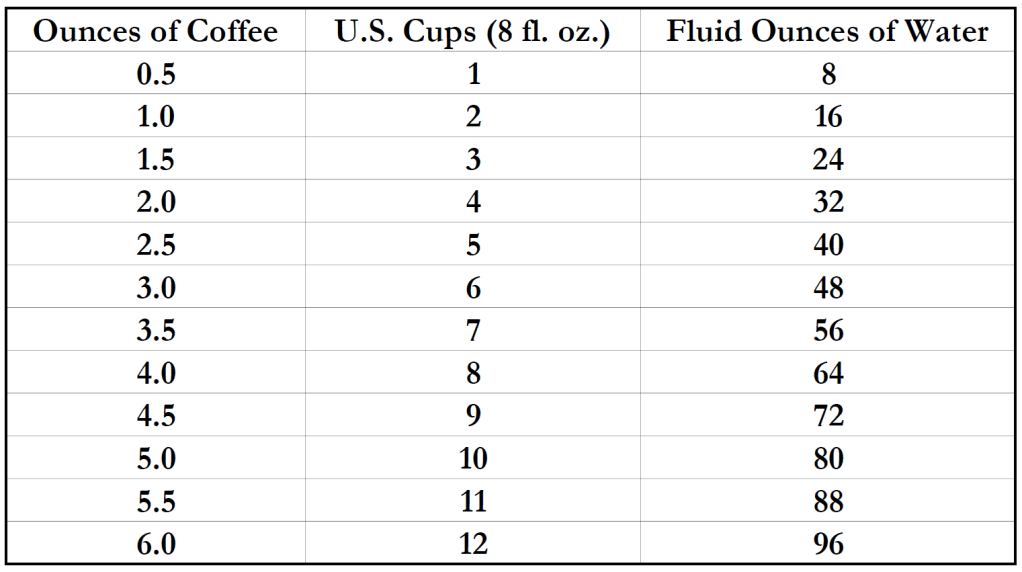
The term “cups” is confusing because in the coffee world it can mean 4 ounces, 5 ounces, 150 ml or 8 ounces depending on the manufacturer of the brewer. You can use a large measuring cup to figure out what your brewer’s markings mean.

I was helping a friend with their coffee recipe once and they told me they used a certain number of tablespoons for every cup of water, once I figured out if they were talking about 4, 5, or 8 ounce cups and I figured out the rough weight of one tablespoon of their coffee, I found out they were using a 1:28 brew ratio, which is a really diluted coffee.

Check our our post about kitchen scales.

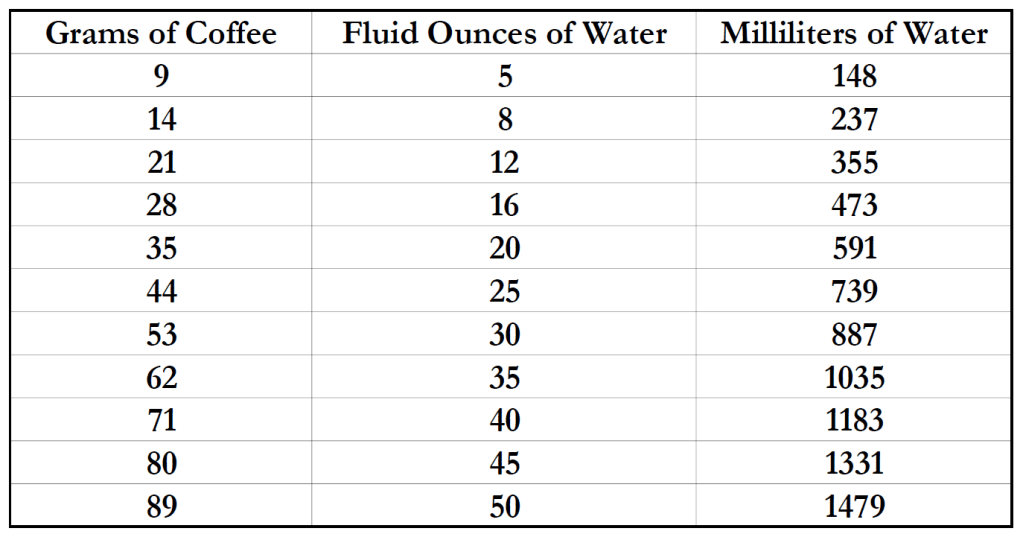
Check out the brew recipe guide below and others on the resources page. I find this useful as I measure my water going into the brewer with a 1 liter measuring cup and disregard the markings on the machine.

If you really can’t weigh out coffee every day because you don’t have a scale at work, are traveling or just don’t want to deal with it, what you can do to try and improve your coffee recipe is, for each type of coffee you use, weigh how much one “scoop” is so you can try to hit the correct ratio when brewing. For me using a level “scoop” that came with my grinder I get between 10 to 11 grams of coffee, which isn’t that exact, but at least I have a baseline for roughly how many scoops I need. For example, to get 30 grams for a 500 ml brew would be about 3 scoops.

Another way is that if you have a grinder with a timer like I do, you can figure out how many seconds it takes to grind your desired amount. Not always exact, but better than nothing. If you use this method you can keep beans in your grinder hopper if you stick with one type of coffee bean. I often change my brew size so this wouldn’t work well for me, if you have a daily brew size it may work for you. Some higher end grinders include a scale and the option to dose by weight or to program grind times for different doses.

I mentioned before that my process is to keep my grinder hopper empty and weigh out my coffee beans then grind until empty. I found this the best way as I rotate through a lot of different types of coffee throughout the week. Most grinders do retain some grounds so if you don’t want to mix your coffees give your grinder a good cleaning when switching out coffee or you can grind a few grams of your new coffee to flush out the old grounds before dosing. With larger brews this makes less of a difference so I usually just switch coffees without worrying about retention. They have grinders made and marketed for low retention, but they are usually well into the $400 to $800 price range.

Friends Don’t Let Friends Use Coffee Pods

Like many of you, my morning coffee routine involved popping in a Keurig or Nespresso pod and filling up a thermos on my way to work, these pods cost about 50 cents each on average, average is also the nicest word to describe the coffee in these pods.

If you follow the drip coffee ratio that most roasters suggest of 1:16 to 1:17 (grams of coffee to milliliters of water), your K-cup is designed to make you about 6 fluid ounces of coffee. Yes, most Keurig machines have different size options, but you’re just drinking more diluted coffee when you pick anything larger than the 6 fluid ounce size. The “strong” setting on your Keurig machine just adds an extra 30 seconds to your brew time to try and improve the extraction.

I was curious how much coffee is actually in one of these pods, the answer is 7-12 grams for a K-cup and about 5-6 grams for the small Nespresso pods. For Keurig you’re paying about $1.42 per ounce of coffee (at 10 grams per pod) and $2.58 per ounce of coffee for Nespresso (at 5.5 grams per pod). A quick search will show you that “premium” coffee usually costs about $1 an ounce and local roasters charge about $1-1.50 per ounce of specialty coffee, so about $16-24 a pound. With pods you’re paying about $23-41 per pound of coffee.

The frugal side of me wanted to find a better option. Why am I paying premium prices for stale below average coffee? The most common answer is, convenience. People need to get their coffee and get out the door. You may be saying well it is cheaper than Starbucks and tastes about the same. While we have to give credit to Starbucks for growing the coffee culture in America, Starbucks coffee is not recognized as good coffee in the specialty coffee world. Compare that to coffee you can get at a shop that roasts their own single-origin beans or does made to order pour over and the difference will be huge.

I found an old ekobrew reusable K-cup in my cupboard and bought some pre-ground coffee and started to use that. However, with more reading I learned that you really need to grind your own beans as everything about coffee centers around freshness. You want fresh roasted beans that are freshly ground before you brew.

There are plenty of articles out there talking about the waste generated by these pods, I won’t get into that because so many others already have. I do know some offer recycling programs also, but my main argument against pods is that you are paying premium prices for below average coffee. For less than the amount you spend on pods, you could be getting premium specialty coffee in exchange for a little convenience.

I started researching better ways to make coffee and eventually landed on the pour over method. It sounds like a pain at first, but after some practice I think it is pretty easy with only a few minutes of your attention required. If you don’t have the time for that I’ve written about other methods for single servings and better convenience.

If pods work for you, then keep using them. In talking to friends and family, I noticed so many of them were deliberate about what they purchased and consumed, but when it came to coffee they were paying a lot more for the convenience of pods. Once they realized with a little more effort and less cost, they could get amazing coffee many of them switched over.

Here are some follow-up posts you might find interesting:

Check out our recommendations and product reviews.

How to Buy Coffee

There is a ton of information out there on this topic, in the spirit of my blog I’m just trying to give you the summarized version. This post talks more about how to make sense of specialty coffee labels.

Don’t buy pre-ground. Don’t do it. You already have the burr grinder and scale I talked about in the must haves post. Coffee is all about freshness, you want fresh roasted coffee beans that you grind fresh right before brewing. This is another reason not to use pods, all that coffee is stale and pre-ground, not to mention overpriced.

The peak flavor for coffee is between 3-18 days after roasting, maybe up to a month. I was at my local organic type supermarket the other day and saw a bag of “premium” coffee and the roast on date was over 2 months ago. Notice I said peak flavor, this doesn’t mean coffee is undrinkable outside of this range, but that most agree this is when coffee tastes best.

Coffee tastes best if brewed within 30 minutes after you grind it, so combine the fact that not only is your coffee going to be 2 months old, it will have been ground 2 months ago. At this point, who cares about freezing, vacuum sealed containers or whatever storage method you use, you’re just preserving staleness. If time is an issue in the morning, grinding your coffee the night before and setting a timer on your coffee machine is just fine, it will be vastly better than any pod or pre-ground coffee you would use. I would not advise using the supermarket grinder though, even though it’s just a week that you’d be using it, grind as close to brew time as possible.

If your coffee only has a “best by” date and no “roasted on” date, stop buying it. Simple as this, if they aren’t willing to tell you when it was roasted, it isn’t worth buying.

Try to buy single-origin or single-estate coffee. Lately there is a lot of focus on sustainability and traceability of coffee. You want to be able to know who grew your coffee, where they grew it, how it was processed, how it was shipped and when it was roasted.

Also to know that in every step of the way things have been done in an ethical and sustainable way from fair wages to use of chemicals and pesticides. Coffee is so much more complex than light, medium, dark or french roast, which is the only information you find on most supermarket coffees. Most of what you see out there are blends of coffee beans, while there are some great blends out there from specialty roasters, the supermarket brands use this method to mix low quality beans with average quality beans to give you average tasting coffee. If you find a great local roaster that has both single-origin and blends, I’d say those blends are better than any supermarket blends.

It doesn’t really matter if you buy organic coffee. Many of these small producers are already using organic methods, however to get the organic certification will cost them thousands of dollars, which oftentimes is out of reach or money better spent elsewhere. If you are buying responsibly sourced single-origin coffee I wouldn’t worry if it is labeled organic or not.

Avoid coffee with flavors and additives. Coffee can have some amazing notes, but when you see flavored coffee, that means artificial flavors have been added during the roasting process. Flavors like french vanilla or hazelnut are artificially added, even by some very popular and successful coffee shops (*cough* Philz *cough*).

Explore light and medium roasts. We have been conditioned over the years to think that dark roasted and bitter coffee is “strong” or “bold” (thanks Starbucks) when in reality this is the way the big producers ensure uniformity. Not to say there aren’t some great specialty dark roasts out there, but usually the more you roast a coffee bean the more uniform and bitter it tastes, which means you can use lower quality beans to achieve this. A lot more of the tones and flavor comes out in light and medium roasts, try it without milk or sugar first and see if you can taste them. Also light roast coffee has more caffeine than dark roasted coffee, contrary to popular belief than darker is stronger. Vienna, French and Italian are all dark or darker than dark roasts.

When you find that great local roaster, try the light and medium stuff first and give them feedback and see what they recommend. Usually when I asked people what kind of coffee they like, they answer with medium or dark roast, but coffee is so much more complex than that. Country of origin, geographic region, bean type, growth elevation, processing method and so much more.

Buy from local coffee roasters. Not only are you supporting your local economy this is one of the best ways to ensure you’re getting fresh roasted coffee. They should be able to tell you when a coffee was roasted and offer different types of single-origin and roast levels. There are also many small and independent roasters all over the U.S. that will ship you coffee that is roasted to order or roasted in the past few days.

Or…. Roast your own coffee. Learn how here.

How to Make Pour Over Coffee

The first time I saw pour over was at Blue Bottle in San Francisco, seemed like a cool way to make coffee. After a lot of research this is now my go to morning coffee process. It seems like a lot of work, but once you get the hang out it, it only requires a few minutes of your attention.

I like pour over because you can make some of the best coffee with a relatively low-cost method, you can get a great pour over setup for under $100, less if you have some of the items at home already. If you go down the rabbit hole of espresso you will quickly realize to get the best results requires a lot of investment in time and especially money. To do espresso properly requires at least $450 for a semi-pro machine and $280 for a good espresso grinder at the higher end you’re looking at $3000 machines and $680 grinders.

Things you need (there are links to the items in this kit on the recommendations page):

This is the James Hoffman technique, there is a video I made down below of the process, I have written it out with some additional detail. I know it seems long and complex, but after a few times it becomes second nature and only requires a few minutes of active attention. I mention this because I can do this with two toddlers screaming for breakfast, so I think most people can manage this. If the times and amounts are a little off, that is ok.. you will refine the process to make it work best for you.

  1. Boil the water in your gooseneck kettle, use filtered (preferably soft) water that is freshly boiled, not water that has been sitting in a warmer.
  2. While your water is warming, using the recipe sheet and on the resources page, grind your coffee by weight to a medium/fine ground. If your coffee comes out too bitter, adjust the grind coarser. Adjust finer if it lacks flavor. Ideally keep going finer until it becomes bitter then adjust it coarser again to ensure optimal extraction.
  3. Insert and rinse the V60 filter paper in your dripper using hot water from your kettle or I use a Zojirushi hot water warmer to do this (the kind I told you not to use for the brewing the coffee), if I am making larger batches sometimes my gooseneck won’t have enough water to rinse the paper and make the coffee. This cleans out any paper taste and also heats up the dripper and carafe. Dump the water after the rinse.
  4. Set your carafe, dripper and wet paper on the scale and tare it to zero then pour in your ground coffee and confirm the amount. It could be less than you put into the grinder due to grinder retention, if it is a gram or two off, I wouldn’t worry too much. Give your dripper a little shake to level out the grounds. Tare to zero again before pouring water.
  5. For this example let’s use 30 grams of ground coffee in your dripper and 500 ml of water, since one ml of water weighs exactly one gram so I use them interchangeably. With your scale at zero, start the timer and pour in a circular pattern 2-3 times the weight of coffee with your freshly boiled water. So 60-90 grams of water for the bloom. Give it a gentle swirl and let it saturate for 45 seconds. This is called the bloom, it helps to release gas and wet the grounds.
  6. Your timer is now around 0:45, within the next 30 seconds pour in a circular pattern approximately 60% of the water. So we want to hit 300 grams by the time the timer hits 1:15. Try to pour the flow to agitate the grounds sufficiently without creating channels in the coffee bed. Some will say don’t pour on the paper, but I think it is ok and I do it to get grounds that are stuck on the paper back into the slurry.
  7. Continue pouring the rest of the water with the goal to finish within the next 30 seconds, around when the timer hits 1:45. After all your water is in take a spoon and give it a gentle stir clockwise and another one counter-clockwise. Once the water level drops down to safe level give it another swirl to flatten out of the coffee bed. Throughout these pours we want to retain as much thermal mass in the dripper as possible, so try not to let the water draw down too much while pouring.
  8. Now let the coffee draw down fully, which should finish at about 3:30. Give the coffee a stir (not swirl) in the carafe before pouring. If your drawn down is much slower or faster than 3:30 try to adjust your grind size finer if it is too fast or coarser if it is too slow.
  9. Try it without milk or sugar first after it cools a little, see if you can detect any notes. If you want to add milk or sugar, you can do so, but try to get a taste of the coffee black first.
  10. If you want to nerd out, use your phone to take down some tasting notes on the type of coffee and if you like it, or if next time you should adjust the grind or whatever comes to mind. Coffee is personal, like wine or food, some people love certain types and others hate it, it is all personal preference.

They make machines that try to replicate this process so you can put in your coffee and just press a button and go. I know people that like them, but I enjoy the process of making it this way. If time is an issue, they may be good to look into. Check out our blog post about how to roast your own coffee at home here.

Best Mid-Range Brewer – Bonavita Connoisseur

The Bonavita Connoisseur BV1901TS Coffee Brewer is the lowest priced SCA certified home brewer at around about half as much as a Moccamaster. It offers bare bones, no frills one touch operation with great results and, like the Moccamaster, has an almost cult like following. It only offers one setting and cannot be programmed and also cannot be used with a timer switch due to the spring-loaded power button that cannot be left in the “on” position.

This is their latest model that offers a hanging basket which is easier to use than their older models where the filter basket awkwardly sat on top of the carafe. There is no drip stop on the filter basket so watch out for dripping when rinsing the filter paper or dumping the grounds, what I do is just leave an empty mug under the dripper after I remove the carafe and then dump the grounds when it fully stops dripping.

The Bonavita Connoisseur has a 1.3 liter (just under 44 fluid ounces) capacity and comes with a thermal carafe. It uses standard type flat bottom basket filters. Moccamaster, Braun MultiServe (review) and the Cuisinart PerfecTemp (review) all use #4 cone filters. You can read all about the latest research here into flat bottom vs. cone filters.

It has a showerhead for even water distribution over the grounds and the only thing you can set on this machine is the pre-infusion option which mimics the bloom process we do in pour over. Hold the power button down for 5 seconds until you hear two beeps and the LED flashes. You will know it is working because the light will flash during brewing if pre-infusion is enabled, the light will be solid if it is not. It will keep the pre-infusion setting until the machine is unplugged. This is highly recommended if you are using fresh roasted coffee to help the grounds degas as part of the brewing process. If your coffee was roasted 6 months ago it won’t make a big difference.

With a 700 ml (about 24 ounces) brew size the coffee temperature was 178F in the carafe and the coffee tasted great and well extracted. The carafe has a little bit of the same issue as the PerfecTemp with pouring the last bit of coffee, but it wasn’t prone to dripping which made this a non-issue. The PerfecTemp issue was that you had to turn the carafe almost all the way upside to get the last bit of coffee out, which caused coffee to drip all over.

Another machine I took a close look at was the OXO Brew 8 Cup Coffee Maker for and I almost bought it. It has roughly the same capacity as the Bonavita Connoisseur at 40 ounces, however it uses a combination of a flat bottom basket filters and a specialty filter for single servings (20 ounces or less). Excuse my nickel and diming, but a standard basket filter is about 1 cent each, a #4 cone filter is about 3.5 cents each, a Hario V60 filter is about 6 cents each, the Kallita Wave 185 that you need to use with the OXO is 13 cents each. I started this process with cost in mind and just felt 13 cents per brew for a paper filter seemed high and I also didn’t want to deal with two different filter types with two different filter baskets. You can check out a video comparing these two machines here.

Check out the Bonavita Connoisseur manual here.

How to Make Coffee with an AeroPress

You may have heard of the AeroPress, these are popular brewers for single servings, taking to the office, travel and camping. They combine the immersion method (like a French Press) with a filter and quick brew times. They make about 6 fl. oz of coffee and are pretty easy to clean.

Below are five different methods I like, there are tons of other recipes out there though. There is even a world AeroPress Championship (WAC) with annual winners.

Things you will need:

You may not have a scale handy, but you can pre-measure your scoop weight and the numbers on the side of the chamber as reference in a pinch. Other recipes call for making a more concentrated coffee then adding hot water after the brew is done to get a larger serving size.

Here is my video of the Stumptown method:

Stumptown Method:

17 grams coffee for 220 ml water. Medium/Fine Grind. Water fresh off the boil.

  1. 10-15 second pour
  2. Stir
  3. Place the plunger on at an angle just to cover the brew
  4. 1:15 steep
  5. Stir
  6. Plunge into cup

James Hoffmann Ultimate AeroPress Technique (Slightly Modified):

13 grams coffee for 220 ml water. Medium/Fine Grind. Water fresh off the boil.

  1. Pour in water quickly (but carefully) making sure all grounds get wet
  2. Set the plunger to create a vacuum
  3. 2:00 steep
  4. Swirl
  5. Wait 30 seconds
  6. Plunge into cup

The Inverted Method

The inverted methods ensures that no water will drip through the filter and allows for a better immersion brew, I tend to avoid these because I have kids at home and am afraid someone is going to knock it over and get burned. One option is to purchase a Fellow Prismo attachment that is leak proof and will allow you to use these inverted recipes using the AeroPress the regular way. It also has a reusable metal filter and allows for more pressure for espresso-like extraction.

Be careful not to spill hot water or burn yourself. With this method everything is upside down, the plunger will be on the bottom and the chamber will be on top, make sure to attach the filter and cap before flipping.

17 grams coffee for 200 ml water. Medium/Fine Grind. Water fresh off the boil.

You are using less water because you want the plunger to be seated in a little further to avoid it separating and causing a spill/burns.

  1. Pour 2x weight of coffee (approx. 34 ml) of water
  2. Stir and bloom for 30 seconds
  3. Pour the rest of the water
  4. 1:00 steep
  5. Stir
  6. Secure filter and cap
  7. Place cup on top and flip
  8. Plunge

If you want something more like espresso try these methods. Add milk for something similar to a latte.

Inverted Method for Espresso-like Coffee:

17 grams coffee for 55 ml of water. Fine Espresso Grind. Water fresh off the boil.

  1. Slowly pour the water over about 10 seconds
  2. Swirl/Stir for 15 seconds
  3. Secure filter and cap
  4. Place cup on top and flip
  5. Plunge quickly to complete the brew under 30 seconds

James Hoffman Inverted Method for Espresso-like Coffee:

18 grams coffee for 90 ml of water. Fine Espresso Grind. Water fresh off the boil.

  1. Pour the water
  2. Stir
  3. 1:30 steep
  4. Secure filter and cap
  5. Place cup on top and flip
  6. Swirl
  7. Plunge

If you’re looking for a larger brew size, in a similar immersion/filter style brewer, check out the Clever Dripper.

I’m Ready to Ditch Pods, Now What?

The most common reasons people cite for using pods is that it’s convenient or they need to be able to make only one serving at a time. Let’s try to tackle these:

I just don’t have the time to make coffee in the morning. If you’re willing to grind your coffee the night before and place it in the coffee maker before you go to bed, you have many great options available to you. You can basically use any coffee maker that has a timer or the ability to be used with a timer. The Technivorm Moccamaster series is an excellent coffee maker that is highly recommended, however it doesn’t include a timer. Since its power switch can be left in the on position, a workaround for this is to hook it up to your smart plug and set it to turn on and off at certain times. You can even set it up to turn on by saying “Alexa, turn on coffee maker” while crawling out of bed. If you don’t want the trouble of that the OXO Brew 9 Cup is an excellent choice with a timer function, if you have one of their other kitchen appliances the look and feel will be familiar to you. Both of these brewers are great machines, check out all our reviews and recommendations for other options.

Here is a full list of home brewers that have been certified by the Specialty Coffee Association (SCA). Any of these will brew excellent coffee from your excellent beans. Unless you plan to transfer your coffee to a travel mug or cup within 20 minutes of brewing, pick a model with a thermal carafe over a warming plate.

They make brewers that have built in grinders, but those have mixed reviews and reliability issues. For best results you should have a standalone grinder. Those brewers will make better coffee than using pods, but for that extra effort of a separate grinder the results will be better and offer a lot more versatility for other types of brewing also. Also some of the lower end models don’t even offer grind adjustment which is a big part of making good coffee.

Make cold brew. Cold brew is easy to make in large batches and can be kept in the refrigerator for up to two weeks. Use a coarse grind with a 1:8 ratio of grams of coffee to milliliters of water and let it in steep for 24 hours in the refrigerator, stirring occasionally. After that use a sieve to remove the large grounds then run it through a paper filter. Add milk or water to taste. This is one brewing method where you don’t need to use your best and freshest beans, for many this is actually the way they use up stale beans without wasting them. Reduce the ratio to 1:4 for cold brew concentrate and add water or milk to taste. I did another post with more detail about cold brew if you want to check it out.

I need the option to make only one serving. All of the coffee makers mentioned above have the option for making different brew sizes, however for most of them that means adjusting the amount of water in the machine as most will brew until the water runs out. For a multi-serve brewer where you can select a brew size, check out the Ninja CM401. If you are willing to spend a little more time you can look into the pour over process which is my personal favorite. Brewers such as the Hario Switch (makes about 14 fl. oz) or AeroPress (makes about 6 fl. oz) are great at making single servings and easy to use at the office. Your pod machine doesn’t offer size choices, only selections for how diluted you want your coffee to be. So if you think the Keurig is making you a 12 fl. oz. cup, it’s actually making you a 6 fl. oz. cup with twice the water.

Must Have Items To Up Your Coffee Game

Two things you must have if you want to up your coffee game:

Weight vs. Volume

Some of you who have done cooking or looked up a famous chef or baker’s recipe knows that many of them don’t use volumetric measurements. Pretty much any baker or cook outside of the U.S. can instantly recognize an American recipe because it uses volume measurements like teaspoons, tablespoons, cups, pints or quarts.

If you want to make your life easier with coffee, use the metric system. Grams of coffee to milliliters of water (this is where the kitchen scale comes in). A milliliter of water weighs exactly 1 gram so it makes this incredibly easy. Most roasters recommend a ratio from between 1:15 to 1:17 for drip and pour over coffee.

Here is a quick cheat sheet for grams of coffee to milliliters of water following the widely recommended ratio of 30 grams per 500 ml or water or 60 grams per 1 liter of water. Another way is to divide milliliters of water by 16.7 for grams of coffee needed, or say I’m at the end of a bag of coffee and only have 37 grams left, multiply by 16.7 and I know to use 618 ml of water for my brew.

Here it is in cups and fluid ounces, with rounding for convenience. Useful if your coffee brewer only lists cups. *This is based off US cups of 8 fluid ounces. Cups can mean 4, 5, 6, or 8 ounces of water depending on your brewer, try to figure out how many fluid ounces you are using vs. cups to avoid the wrong ratio.

If your coffee recipe involves number of scoops per cups of water, consider switching to a weight based recipe. Coffee beans come in all different sizes and water content and using a volume measure like a scoop is not at all precise.

Check out our post about kitchen scales.

Burr Grinder

The single most important thing to adjust the taste of your coffee is the size of the grind. It is recommended that you don’t alter anything else about your coffee recipe other than the grind size to adjust the taste. So if your coffee is too bitter, the solution isn’t to add more water to dilute it, the answer is to adjust your grind coarser. If your coffee is weak or sour you need to adjust the grind finer. The only way you can get a consistent and even grind, is to use a burr grinder.

A blade grinder works like a food processor or blender and just chops your coffee beans into inconsistent chunks of coffee. Invest in a burr grinder, this will cost anywhere from $80-140 for a decent electric grinder.

For each type of coffee you get, ideally you should adjust your grind finer and finer until you taste that bitterness you don’t like, the adjust it coarser just a little to know you are getting the ideal extraction level.

Check out our grinder recommendations here and our review of two of the most popular entry level grinders here.

Cuisinart PerfecTemp Review

A quick search will show you that these PerfectTemp coffee makers are amongst some of the best reviewed and most popular mid-range brewers. The Cuisinart DCC-3200P1 PerfecTemp Coffee Maker with Glass Carafe has a ton of reviews, however since I recommend finding a coffee maker with a thermal carafe, I tested the Cuisinart DCC-3400P1 PerfecTemp Coffee Maker with Thermal Carafe. This machine is not SCA approved, but comes in at a lower price point than those brewers.

The machine has a lot of great features, it has a showerhead to drip the water over the grounds, it can be programmed for auto brew, it has a large capacity of 96 ounces (75% of a gallon), has a drip stop filter basket and makes good coffee. With the name PerfecTemp I wanted to compare the brew temperatures with other machines/methods. I used 24 ounces (around 700 ml) as a brew size and the Cuisinart PerfecTemp brewed coffee was 175F, the SCA approved Braun MultiServe I previously reviewed was also 175F (although I’m sure that was aided by the hot plate) and a V60 pour over with freshly boiled water was 178F.

While the brewer has good features and makes good coffee, the carafe is terrible. The way it is designed means you basically have to turn the carafe upside down to get out all the coffee, which would lead it to drip all over. Many people when making coffee in this type of brewer will first fill the carafe and use that to pour water into the machine, with the way the water tank is designed this can’t be done without pouring water all over. I resorted to using a large measuring cup or separate pitcher to fill the water tank. The way the brew pause and filter basket is designed you must brew into the provided carafe and cannot brew into a mug or anything else.

This brewer come with a reusable metal filter, but I recommend you use #4 cone paper filters for best results. The carafe for this machine was just too awkward to want to use on a daily basis. If you are ok with a brewer with a glass carafe and hot plate, I would recommend you get the Ninja Programmable Brewer (review). Or get the Bonavita Connoisseur (review) at a slightly higher price point.

While it looks like the carafe for the Cuisinart DCC-3200P1 is designed better, it has a 112 ounce capacity (87.5% of a gallon) and with my prior recommendation that you don’t keep a carafe on a hot plate for more than 20 minutes, I’m not sure this is the machine for smaller brew sizes or for keeping coffee warm all morning.

Check out the manual here.

Braun MultiServe Review

In another post recommended two coffee brewers that were on the higher end with great reviews and features, but I wanted to review a coffee brewer that could easily make single servings of coffee with a lower price point, the Braun MultiServe Machine KF9070SI.

This is the one of a few* home brewers certified by the Specialty Coffee Association (SCA) that has the option to brew different servings sizes without changing the amount of water in the machine. Most coffee machines will brew until the water tank is empty, so if you put in 24 ounces of water you cannot then choose to brew 16 ounces unless you dump some water out. I think for convenience it is easier to fill the tank every day or two and only have to worry about dosing your coffee.

SCA approval is a process where the manufacturer can pay a fee for SCA to test their home brewer, if it passes all the tests it can be marketed with this certification and listed on their website. The gold setting on this machine means that it meets the SCA Golden Cup recommendations with regard to brew temperature, time, extraction and many other factors you can read about here. There are many great coffee makers out there that don’t pursue this certification, but for the manufacturer to go through this process, to me, it means they want to show their specialty coffee consumers that their brewer meets the highest standards.

I chose this because I felt the typical use case for a household with a Keurig or Nespresso machine is that only one or two people drink coffee in the household and they need easy single serving size options. I felt that if your household was the kind to need 40+ ounces of coffee in a large carafe that needed to remain warm for hours for multiple pours, you likely already have a traditional drip coffee brewer. They sell single serve machines, but for me I also need the ability to make a larger batch when I have guests.

The Braun MultiServe Machine KF9070SI a pretty big and bulky machine, but looks pretty good. The only difference between this model and the KF9050 is that the KF9070SI has more stainless steel by the selector dial. The KF9150 and KF9170 add the ability to dispense hot water with temperature selection with different color options.

It made great coffee, but the control system is not great. Right out of the box I was hit with an error message that required me to perform a 23 minute descaling cycle to resolve, after that I was able to make some great coffee in different brew sizes. With this machine you would only need to adjust the amount of coffee you put in and keep the water tank full. Overall, if you need the ability to select different brew sizes without having to also measure out water, this is a great option for you once you get used to the controls.

It comes with a reusable metal filter, but I recommend you use it with #4 cone paper filters. I tested it with natural/brown paper filters, but bleached are preferred if you can find them because they transfer less paper taste. Nowadays filter papers are bleached using a process called oxygen-bleaching and not with high amounts of chlorine bleach as you might have thought, they are safe to use although some are not compostable like the natural/brown ones are. If you choose to use paper filers, just insert it into the basket directly and set the metal filter aside.

The Braun MultiServe can auto brew so you can wake up to a hot pot of coffee. One thing I noticed is that my Contigo 20 ounce and Zojirushi 16 ounce travel mug would not fit under the dripper due to the low cup clearance height, so you would need to brew into the carafe (or something else) and then transfer it.

This brewer has no option for a thermal carafe which would have been a big plus. It uses a hot plate on the half and full carafe settings, however as long as you transfer the coffee to a travel mug or cup within 20 minutes it shouldn’t be an issue. What you want to avoid is leaving it on there for hours (this model shuts off the hot plate after two hours) while it cooks your coffee (the plate was about 190F per my measurements). I think the best use case for this machine is having the machine start when you wake up, then pour the coffee and go on your way to work rather than having it sit on the hot plate. If you need to keep coffee warm for many hours for multiple refills, I’d go with a brewer with a thermal carafe. We recommend the Ninja CM407 as a SCA certified MultiServe that comes with a thermal carafe (see our full review of the CM401).

I posted about how we should measure coffee by weight and not volume, so I made this chart as a quick guide to show how much coffee to use for the different presets and markings on this machine.

I always keep my grinder’s bean hopper empty since I switch different beans all the time and use different quantities. My process is that I measure the amount of whole beans I need with my scale, then I put them in my grinder and run it until it is empty. If I am brewing right away, I will rinse out my filter paper with hot water to try and get some of that paper taste out. If not, place your ground coffee into the dry filter paper and set the auto on feature on the gold cup setting (this is the mode that meets the SCA standards). One of the good design features is that the filter basket has an integrated drip stop so it makes it easy to empty the grounds or rinse the filter paper without it dripping all over.

I’ll give an example of the poor controls, next to the power button is the clean feature to descale the machine. If you accidently press it, it will start a 23 minute descaling process that you cannot stop, not even if you unplug the machine. I assume this is because they don’t want you to drink a bunch of descaling solution. Not only that, the process stops with 4 minutes left, which is when you are supposed to fill the water tank and push clean button again for the final flush of the process. If you didn’t read the manual your coffee brewer would just be stuck like this and unable to brew coffee. I would find that very frustrating if I was just trying to get out the door with my coffee. Other Braun brewers require two buttons to activate the clean cycle, while other brands require a long press to avoid accidental selection.

Here is a link to the manual, I like looking at these to get a feel for the user interface, features, limitations, etc.

*Ninja has SCA approved brewers with serving size selection, but looking at major retailer inventory at the time this was written they appear to be discontinued and/or out of stock. The post was updated to include a recommendation for the Ninja CM407 as a thermal carafe option. Full review of the Ninja Specialty Coffee Maker coming soon.